
Fabric Properties
Using The Material Library
Eclipse uses the same Material Library Server as PatternSmith 11. To point Eclipse to the correct Library, go to File - Preferences and setup the Material Library Server there.

To open the library, Click Find In Material Library.


1. Ribbon Interface: Gives access to adjust groups, sort the order of the groups, and search for any material.
2. Groups: Lists all the groups of materials in your library.
3. Materials: Lists materials in the selected group. Drag from this area to a Workspace or Project.
4. Workspaces: Drag a material into this area to add it to all of the open projects.
5. Project Materials: List materials being used in the current project. Drag a material into this area to add it to the current project.
6. Material Properties: Use to edit properties of materials in the library or current project.
7. Library Changes: When using the Server function a list of all the changes on the Material Library Server. The time, user, and what changes were made will be listed.

In the material library, navigate to the material you want to use and drag it to the Project area on the right side.
When you send an awning to PatternSmith, it will retain its material.
Width
Large panels on Waterfall, Marquee, and Traditional awnings will need to be sliced into fabric sized panels. Eclipse needs to know the actual fabric width and the selvage width to do that correctly. Most fabric comes in nominal widths of 46 and 60 inches, with a selvage of 0.50” very common. The actual fabric width is usually between 45 and 47 inches.
Enter the Width and Selvage Width of the material you are using. When you change those values, press the Tab key to cause Eclipse to recalculate.
**NOTE** Each time you get a new roll of a material, it is CRITICAL that you measure the actual width and update that material’s width in the library.
Pattern
Choose which type of material you are using. To select an option, click the name of the type of fabric.
Solid Fabric
For solid colored materials, select Solid Fabric.

Striped Fabric
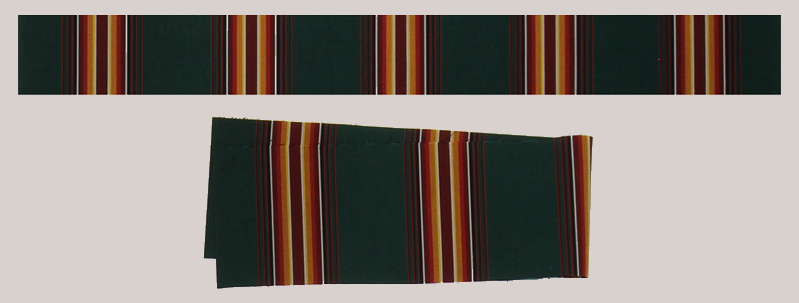
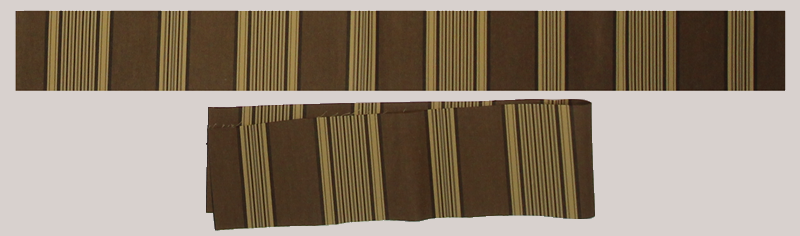
When you are using striped fabrics, Eclipse needs to know the repeat distance and how you want the fabric aligned on the awning. Stripes come in two different types, Single Stripe and Alternating Stripe. If you are unsure what type your fabric is, fold the material about the center line. If the same pattern is on top of each other, then it is a single stripe.
Single Stripe
Alternating Stripe
Single Stripe
If you have a single stripe fabric, select this option. Enter the Number of Repeats. Additionally, you can choose to put the awning centerline on the Stripe or Background of both the front and side panels.
For striped fabrics with an even number of repeats, the background is on the center of the fabric panel; for an odd number of repeats, the stripe is on the panel center. This will affect where Eclipse places slice lines.

Alternating Stripe
If the material you are using has alternating stripes, select this option. Enter the Number of Repeats, the Lower Edge distance, and the Upper Edge distance. These values are talked about below. Additionally, you will need to select either Stripe #1 or Stripe #2 to align to the awning centerline.

Repeat Distance For Alternating Stripe Fabrics
Alternating Striped fabrics have two distinct stripes, Eclipse needs to know the distance from the Lower Edge to the Stripe 1, the Upper Edge to the Stripe 2, and which stripe you want to align with the valance cells. The example below shows how the material is oriented on the table for cutting. Stripe 1 towards the operator and Stripe 2 away from the operator.

Use this technique for the position of the alternating stripes:
- Roll out about a foot of fabric on the cutting table, just like you will cut it.
- Count how many repeats of the pattern there are. Enter that value in Number of Repeats.
- Measure the distance from the nearest edge of the fabric to the centerline of Stripe 1. Enter the distance in Lower Edge.
- Measure the distance from the near edge of the fabric to the centerline of Stripe 2. Enter that distance in Upper Edge.
- Select the stripe you want to be centered in the valance by clicking Align to Stripe #1 Offset or Align to Stripe #2 Offset.
Alignment
You can choose to align the centerline of the awning with either the Center of a Panel or the Edge of a Panel. For striped fabrics with an even number of repeats, aligning a stripe to the centerline will take precedence, so the panel center or edge can be shifted half a repeat off centerline.
Eclipse will take care of the rest of the details for you. When you switch to the Flattened View, you will see the stripes aligned with the green centerline of the panel and with the red slice lines, on the front and the side panels. You can try both options to see which saves material.
Fabric Stretch
If you want Eclipse to compensate for fabric stretch, check Compensate for Fabric Stretch. Horizontal (weft) is the short threads across the width of the fabric. Vertical (warp) is the long threads going all the way through the roll of fabric. When an awning requires multiple panels for either the front or side, the Horizontal stretch compensation will only be added to the outer most panels.
Enter the stretch values in the horizontal and vertical directions. Typical values would be 1/4 – 1/2” per 10 feet, or 0.2 – 0.4%.
